Student Setup Guide
Complete these steps before the lab begins. By the end, you will have your own private copy of the lab repository, dependencies installed, and Claude Code ready to go.
Step 1: Create Your Private Repo from the Template
Open the template repository in your browser:
https://github.com/airs-labs/prisma-airs-mlops-labClick the green "Use this template" button (top right, next to "Code").
Select "Create a new repository".
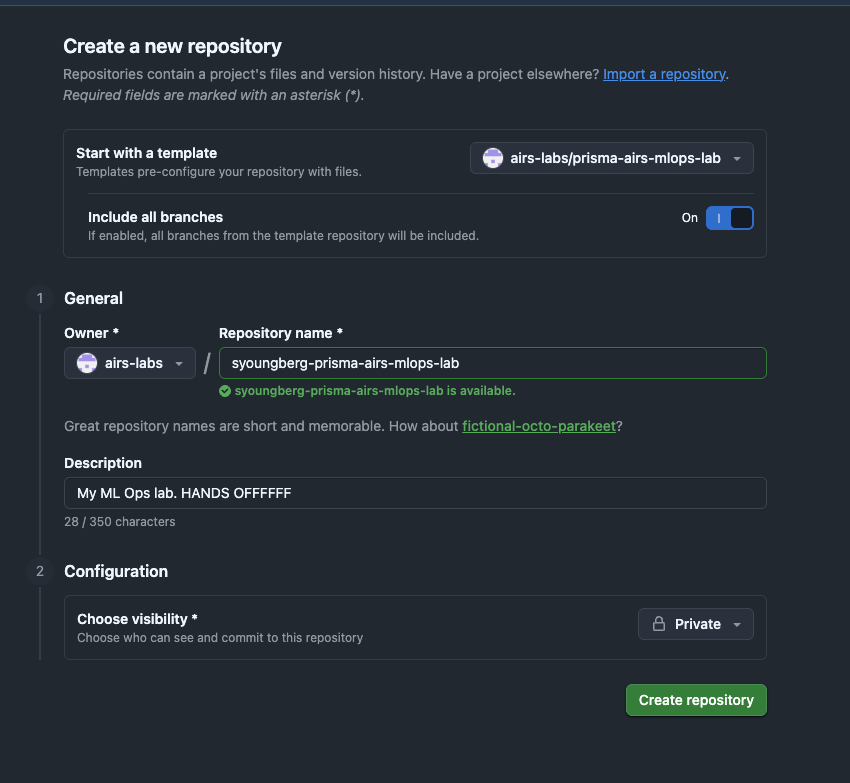
Configure your new repo (see screenshot below):
- Include all branches: Toggle On -- this is required so you get both the
labbranch (your workspace) andmainbranch (reference solutions) - Owner: Select
airs-labs(the workshop organization) - Repository name:
<your-name>-prisma-airs-mlops-lab(e.g.,syoungberg-prisma-airs-mlops-lab) - Visibility: Select Private
- Include all branches: Toggle On -- this is required so you get both the
Click "Create repository".
Why private? GitHub Secrets are repo-scoped. Your repo will contain GCP project IDs, AIRS credentials, and deployment configs specific to your environment. A public fork would expose these.
Step 2: Clone and Switch to the Lab Branch
Clone your new private repo:
bashgit clone https://github.com/airs-labs/<your-name>-prisma-airs-mlops-lab.git cd <your-name>-prisma-airs-mlops-labSwitch to the
labbranch:bashgit checkout labThe
labbranch is your working branch. It has the pipeline structure in place but AIRS scanning is not yet integrated -- that is what you will build during the workshop.The
mainbranch contains the completed reference implementation. You can compare against it anytime withgit diff lab..main.Install Python dependencies:
bashuv syncIf you don't have
uvinstalled:curl -LsSf https://astral.sh/uv/install.sh | shthen restart your terminal.
Step 3: Launch Claude Code
Open Claude Code in the repo directory:
bashclaudeClaude has been pre-configured as your lab mentor through the
CLAUDE.mdfile in the repo root. It knows the codebase, paces its explanations, and uses Socratic questioning to guide you.Start the lab by typing:
/lab:module 0Module 0 walks you through verifying your GCP project, GitHub CLI, and AIRS credentials. Claude will also help you connect your repo to the template for receiving instructor updates.
Quick Reference
| Command | What It Does |
|---|---|
/lab:module N | Start or resume module N |
/lab:verify-N | Run verification checks for module N |
/lab:hint | Get a progressive hint for your current challenge |
/lab:explore TOPIC | Deep-dive into a concept |
/lab:quiz | Test your understanding |
/lab:progress | See your completion dashboard |
Resuming Work Between Sessions
When you come back to the lab after closing your terminal or starting a new day:
Step 1: Pull Instructor Updates
Before starting Claude Code, pull any changes the instructor has pushed. Open a terminal in your repo directory and paste this prompt into Claude:
cd <your-name>-prisma-airs-mlops-lab
claude
Check if I have an "upstream" remote pointing to airs-labs/prisma-airs-mlops-lab.
If not, add it. Then fetch upstream and merge upstream/lab into my current branch.
If there are merge conflicts on lab/.progress.json or .github/pipeline-config.yaml,
keep my version (--ours) since those have my personal config. For everything else,
take upstream's version (--theirs).Claude will handle the git commands and resolve any conflicts automatically.
Step 2: Restart Your Lab Session
If upstream changes updated CLAUDE.md or any lab files, Claude needs to pick up those changes. Exit and restart Claude Code so it reads the latest instructions:
/exitclaudeStep 3: Pick Up Where You Left Off
Your progress is saved in lab/.progress.json, so Claude knows exactly where you are. Run:
/lab:progressThis shows your completion dashboard — which modules are done, your points, and any blockers. Then resume your current module:
/lab:module NReplace N with whatever module you were on. Claude will read your progress file and continue from where you left off.
Why not /resume?
/resume recovers your previous conversation but keeps the old CLAUDE.md instructions. After pulling instructor updates, a fresh session ensures Claude is working with the latest lab content. Your progress isn't lost — it's all in .progress.json.
Manual steps (if you prefer to do it yourself)
Add the upstream remote (first time only):
git remote add upstream https://github.com/airs-labs/prisma-airs-mlops-lab.gitPull changes:
git fetch upstream
git merge upstream/lab --no-edit
If you get a merge conflict on lab/.progress.json or .github/pipeline-config.yaml — keep your version (these have your personal config):
git checkout --ours lab/.progress.json .github/pipeline-config.yaml
git add lab/.progress.json .github/pipeline-config.yaml
git commit --no-edit
For conflicts in other files (lab guides, code, workflows), take the instructor's version:
git checkout --theirs path/to/file
git add path/to/file
git commit --no-edit
Troubleshooting
| Problem | Fix |
|---|---|
| "Use this template" button not visible | Make sure you are signed into GitHub and have been added to the airs-labs org |
lab branch doesn't exist after clone | You missed "Include all branches" during template creation -- delete the repo, recreate with the toggle on |
uv: command not found | Install uv: curl -LsSf https://astral.sh/uv/install.sh | sh and restart your terminal |
claude: command not found | Install Claude Code: npm install -g @anthropic-ai/claude-code |
| Claude doesn't seem to know about the lab | Make sure you're in the repo directory and on the lab branch -- Claude reads CLAUDE.md from the repo root |
Merge conflict on lab/.progress.json | Keep your version: git checkout --ours lab/.progress.json && git add lab/.progress.json && git commit --no-edit |
upstream remote not found | Add it: git remote add upstream https://github.com/airs-labs/prisma-airs-mlops-lab.git |